
What’s your #1 priority tomorrow?
weatherproof the bunkie exterior walls!
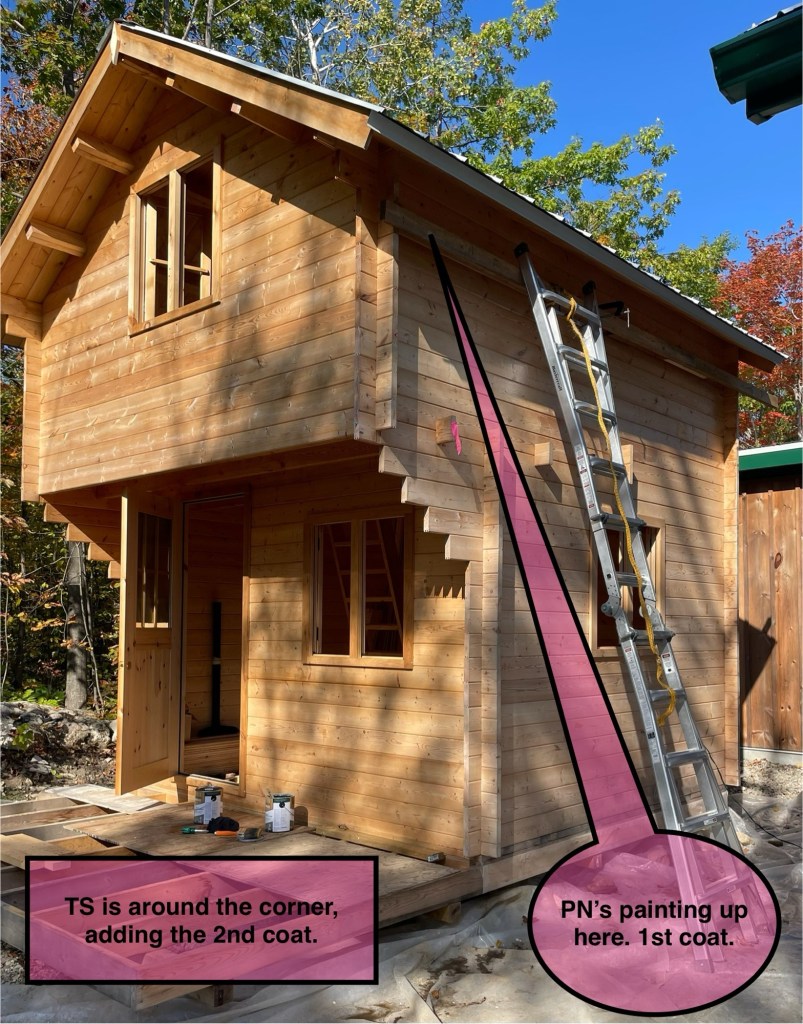
TS and I are preparing our DAY-USE-ONLY bunkie for its protective painting. We removed the screens (thus releasing the swarming cloud of cluster-flies from the bunkie’s rafters) and are about to apply drop cloths around the building’s exterior. We’re going to leave the inside walls unpainted for now. Once the rockwool insulation and flooring are hammered down (we might even glue-and-screw it), we’re planning on applying a non-toxic floor wax to protect the surfaces. Then guard rails and inside ladder will get assembled, treated, and screwed into place. Window and (re-hung door) hardware. Before the snow flies, we need to apply galvanized metal landscaping fabric around the bunkie’s foundation to keep the critters out. Next year: talk to our electrician about running electrical power to the bunkie so DAY-USERS can use the studio space.
What materials are we using? Home Hardware BeautiTone Wood-Shield, clear finish. Item: #1866-853 Model: #WS-95-09 3.40L: #WS-95-09 3.40L ; TS and I observed the following issues with the product:
- It’s easy to clean up after a painting session. With soap and warm water, TS cleaned the brushes and tools in our laundry room sink. We are in a septic system, so I’m hoping it can biodegrade the paint with enough processing time. If not, then at least the compounds will be downstream from our well (Evolve Builder’s painters poured their first batch of water-based paint tailings into our forest — a stupid move that necessitated our ex-construction manager to dig up the contaminated ground and throw it into the household garbage).
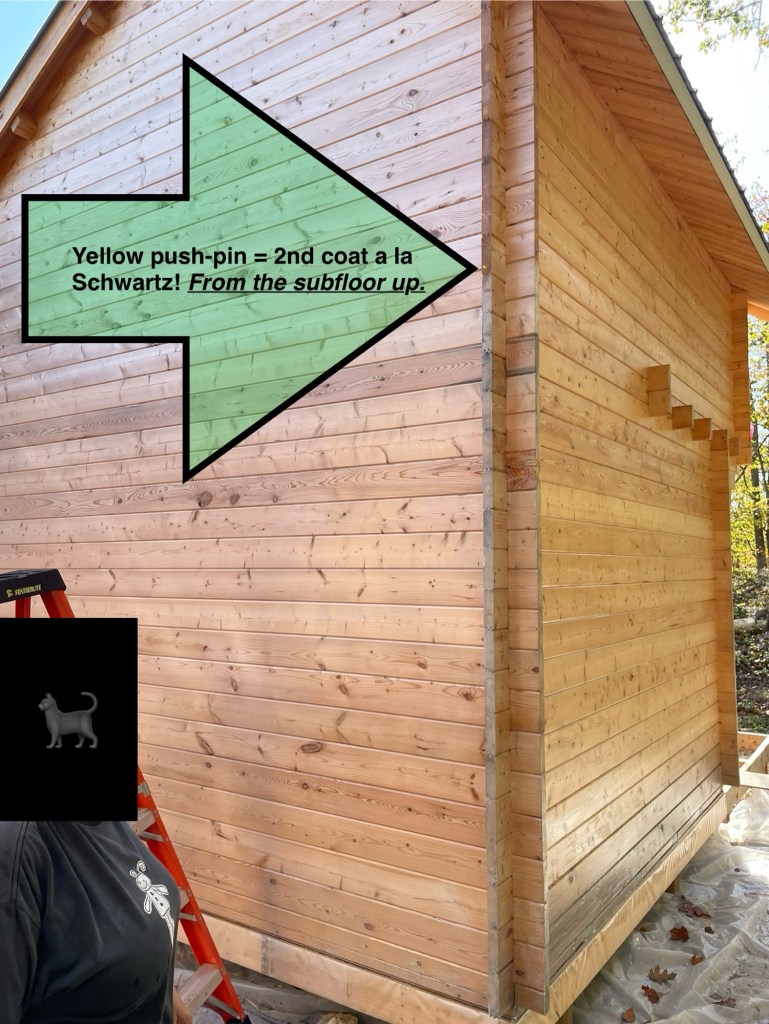
- When the finish was in liquid form in the can, it was opaque. Since we insisted that it remain untinted, it looked like diluted white construction glue when it was applied to our pine-spruce siding. As it dried on the wood, it became translucent… eventually matching the underlying wood’s colour (any blemishes or greying is still visible [nothing’s hidden]). We had to use coloured push-pins to delineate stained-unstained sections.
- It’s significantly safer and more comfortable to use than oil-based stains. We covered the bare earth and gravel around the bunkie with used plastic sheets to capture splatter and drips. We don’t want to add unnecessary toxins to the ecosystem. Interestingly, when the splatter dried, it remained a pale, translucent white-cream-beige colour. This stain is essentially odourless. While the product doesn’t aggressively soak into the wood like mineral-oil, penetrating oil, or linseed oil, neither TS nor PN suffered vapour-headaches, haven’t slipped on slick oily surfaces, nor damaged skin after the job.
- It seems to be a cost-effective option for protecting our investment. We purchased three 3.4 litre cans of paint-stain from Wilson’s Building Supply for ~$131 CAD, untinted (we insisted upon it [the technical document instructs the vendor to tint it [probably because it looks like watered-down beige wood glue otherwise]…here’s a link to HH’s 2019-dated technical-information sheet). TS taught me how to paint with minimal drips and we followed the instructions both on the can and via its data sheet. As of October 1/25, one can has covered 2/3 to 1/2 of each wall in 1 coat. With the remaining 2 cans, we’ll get the tricky top half of the bunkie (there’s additional nooks & crannies and affectations that have to be painted-stained). The 2nd coat will be telling — how much will continue to soak in? How many additional cans of untinted paint-stain will we need? STAY TUNED.
So, how about the physical act of painting a bunkie? There’s a lot of stretching and side-to-side movement with brushes. Paint with the grain. PN hazards going up a ladder (generously lent to us by our RMT in Lion’s Head [it’s a beefy folding aluminum device that also taxes our grip]).
By the end of each painting session, PN was borderline incoherent and was growling & ear-flicking at TS (note to TS = my nasty behaviour is NOT your fault; you have the right to stand your ground and NOT TOLERATE my moods). Both of us are closing most of the fitness rings on our iWatches, and we both agree painting a house is exhausting work. The weather has been cooperating with us, and we are enjoying 15-20C autumn painting days. No rain yet. We resume painting once most of the dew has evaporated. I’d much rather paint-stain walls at this time of year, instead of during the summer heat and oppressive humidity.
This paint-stain does add additional dampness to the bunkie’s walls. That’s a pain, as it exacerbates the flexing and warping we experience with this kit (warning = if you buy such a bunkie, assemble it A.S.A.F.P… don’t do what we did [no layaway plan unless you have assurances that the pallet is stored inside a heated warehouse]… and don’t dawdle with assembly as the kit is a hydrophilic sponge). Once we get a small pellet stove inside the bunkie (or other such auxiliary heating device), it can start drying out. That’s good. According to the documentation, the product will fully cure after 14 days. Right now is our ideal painting window — dry. Cool nights. >15C days. Windy. No driving rain nor snow (yet).
Good news: according to the documentation, if we apply the 2 coats of BeautiTone, allow 24h drying times between applications, it can withstand the elements between 12-24 months. To ensure maximum protection, we re-apply the stuff every 2 years. Realistic assessment: will we really restain the bunkie that often? That… that I’m unsure of. Do I want to spend my money (and time) on re-painting the walls every 2 years? How about every 5 years?! I could have a youngster get all macho/macha and let her do it. Pay them to do it. Meh, we’ll see.
This winter, we’ll need to clear the snow around the outbuilding’s perimeter. The metal mesh skirt will allow air circulation and keep the critters out.
We have a family friend coming up to help us install the Rockwool insulation to the subfloor, glue-and-screw down the flooring, screw in the interior ladder to the bunkie’s loft, assemble the loft’s safety-railing, re-true the fucking door, and apply window-door hardware.
And after that, TS and I host a Thanksgiving dinner for Toronto guests. REMEMBER = OUR BUNKIE IS FOR DAY-USE ONLY. IT’S A STUDIO. A REFLECTION BOOTH. NBP OFFICIAL = ARE YOU READING THIS POST? YES = IT IS A ~100 SQUARE FOOT STRUCTURE THAT YOU SAW DURING THE DECEMBER 2024 OCCUPANCY INSPECTION. NO PLUMBING. IT’S JUST SITTING THERE NOT PISSING ANYBODY OFF. OKAY?
troubleshooting and repairing a sportsman with intermittent power failures.
Our 2018 Polaris Sportsman quad-bike-ATV. When it works, it’s like driving a car. Power steering. Fuel injection. Disc brakes. Switch from 2WD to 4WD with the flick of a toggle. Electric start. Hell, it even has a push-button override for its reverse-speed limiter. Note all that 12VDC electric this and that? Since last year, I’ve had the electronic display blank out sporadically. And also have 1 hell of a vampire load. These fancy dancy sports bikes will brick out if there’s a power loss. Last year, the voltage level plummeted to <10VDC while I was driving on Lindsay Road 40 (yep, I’m all licence plated, helmeted, insuranced, and sober when on public roads [that’s how I roll]). The automatic braking system kicked in and the unit ground to a stop. I was able to use jumper cables to get it fired up and limped back home. Since then, the battery couldn’t keep a charge for longer than about a week before I have to plug it into a battery charger.
Unlike our Toyota TACO, this Polaris Aye Tea Vee is a pleasure craft. It’s NOT a critical piece of farm infrastructure — I’m willing to do my own maintenance on the rock farm (the truck gets maintained by professional mechanics). With the service manual in hand, and notes from the various Polaris newsgroups, I hunted for electrical faults!


I learned the following about intermittent electrical failures:
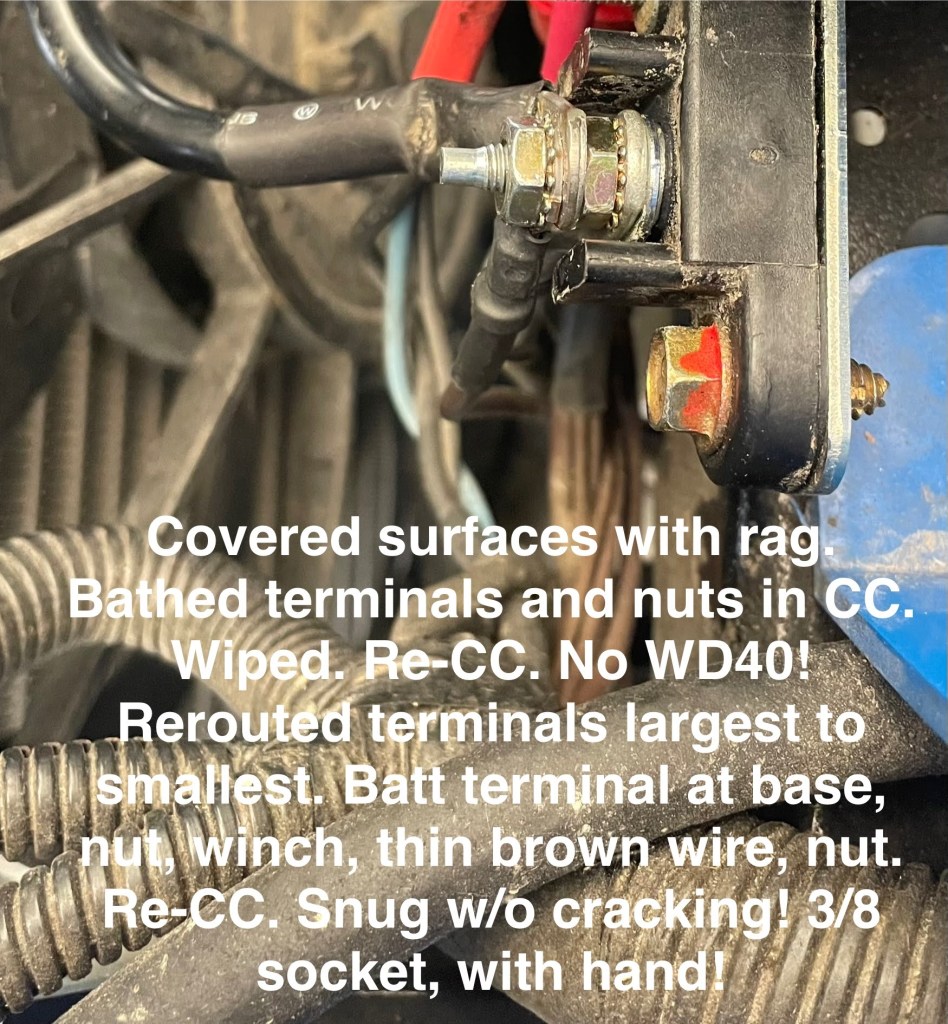
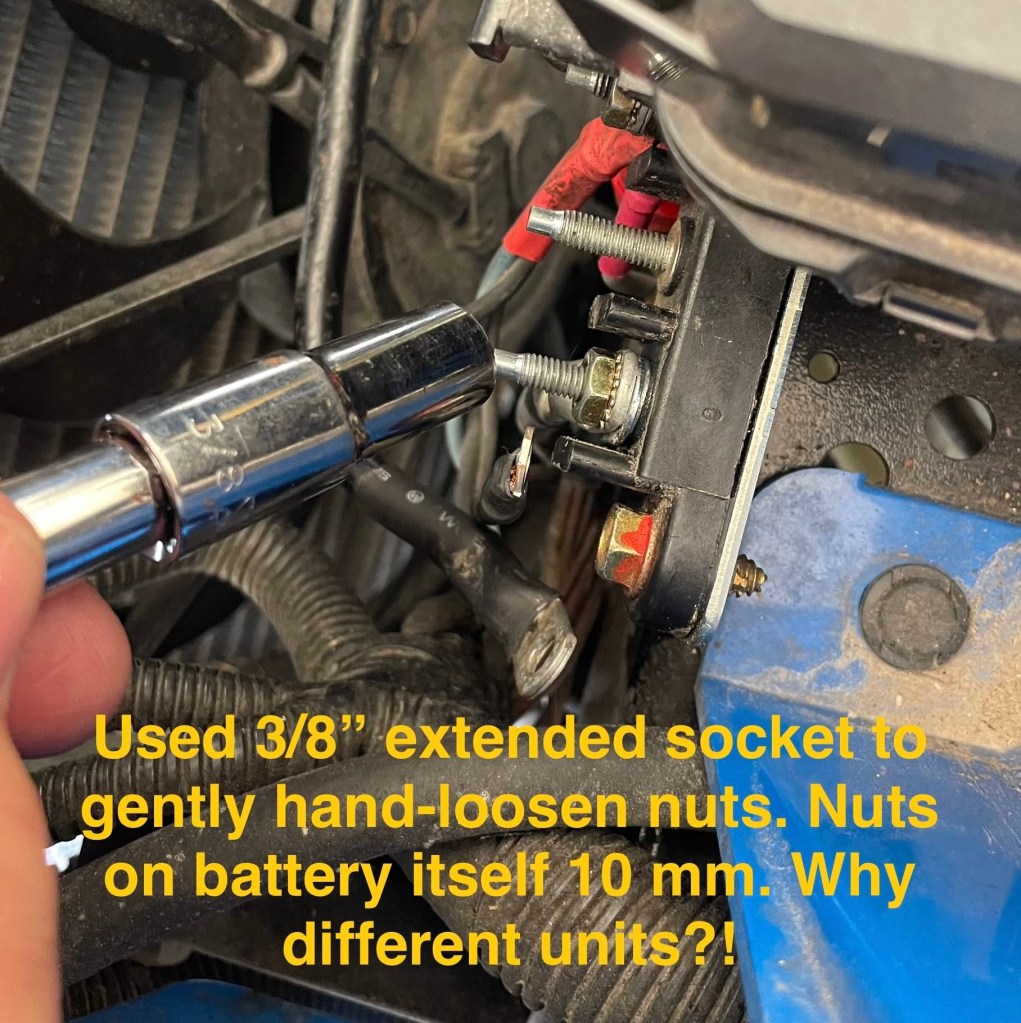
- Keep connections corrosion free — good housekeeping prevents drama. That includes the 12VDC battery terminals (they’re Pb and will react slowly with the metal contacts in the presence of brine or dampness).
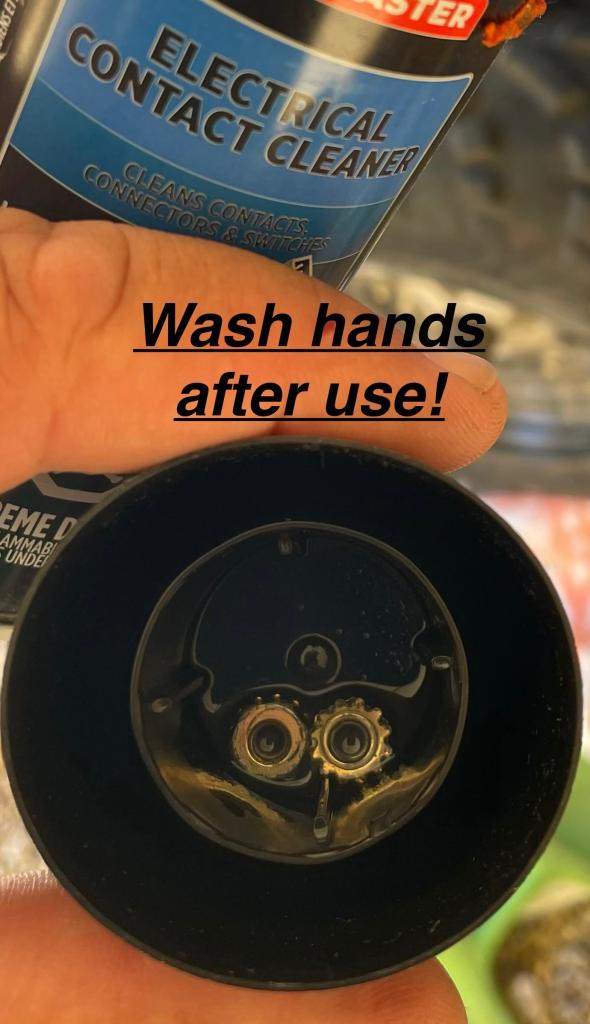
- Use automotive-grade corrosion cleaner, with the appropriate PPE (I won’t try using it bare-handed again [stupid Neem move]… use nitrile gloves). I’m going to dig up some dielectric grease and smear some onto the lead battery posts. I’m assuming its properties are similar to brake cleaner – an aggressive degreasing and deoxidizing agent.
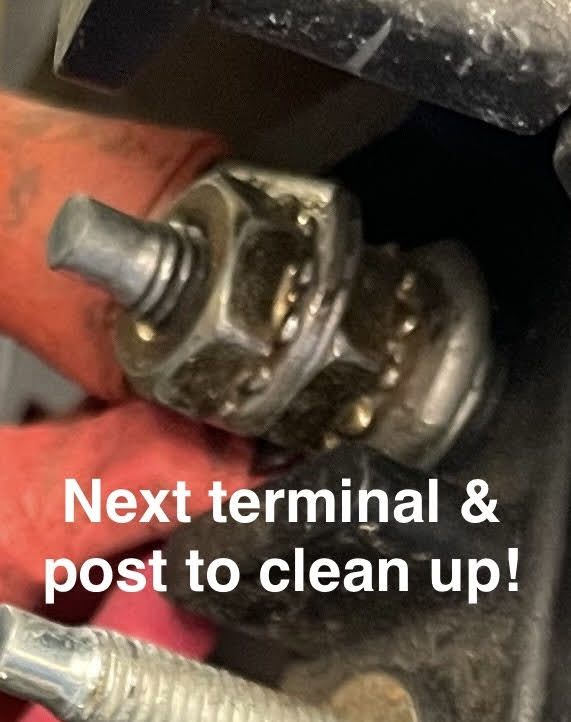
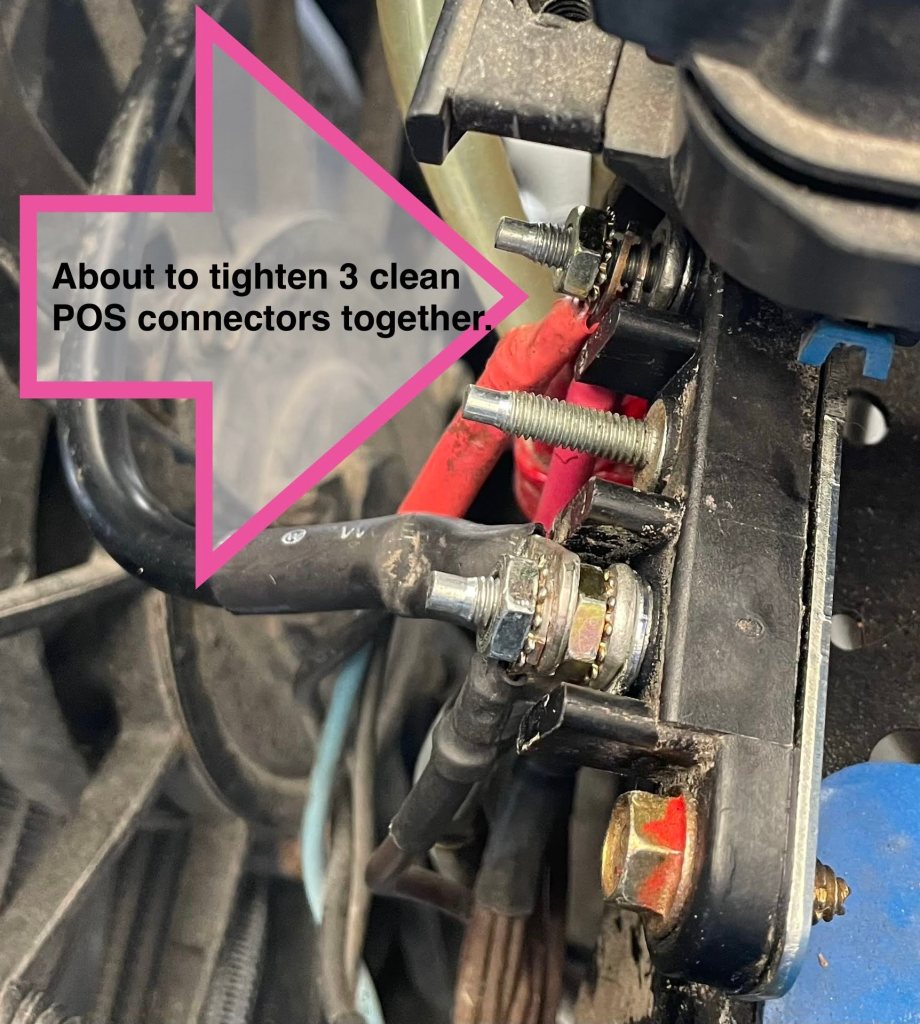
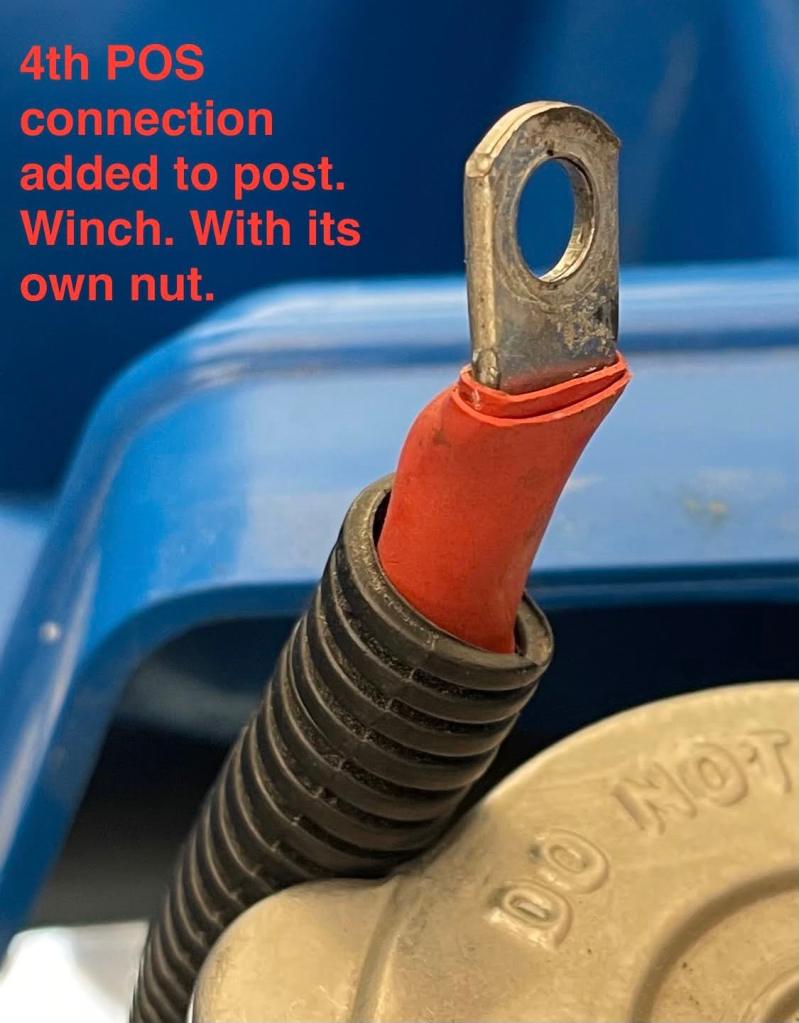
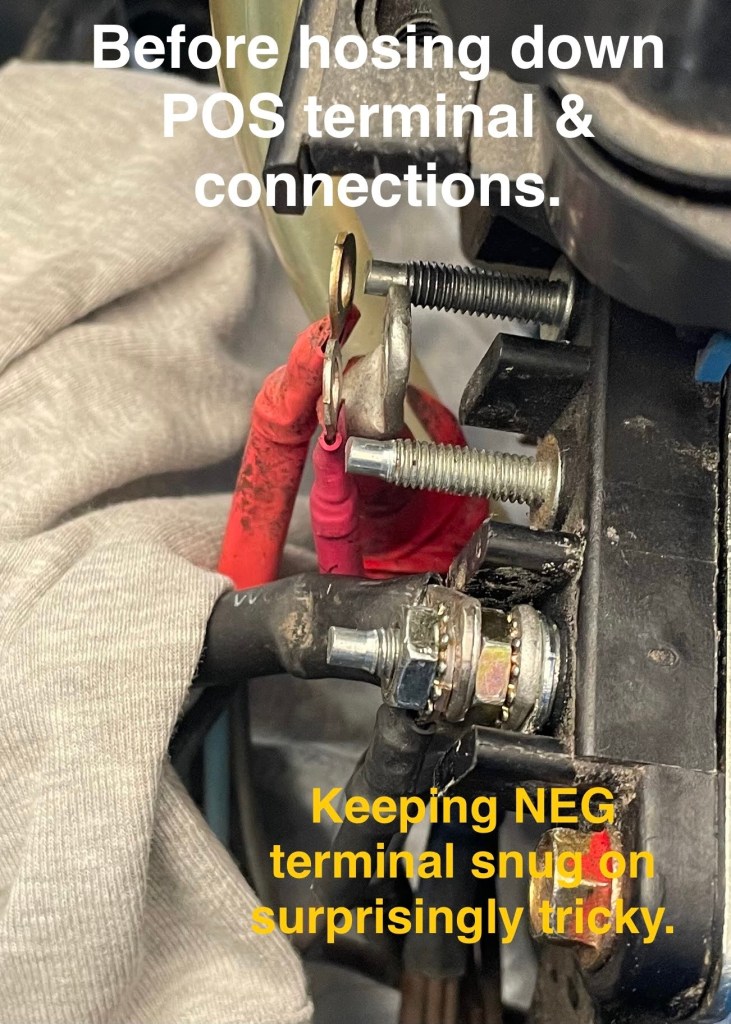
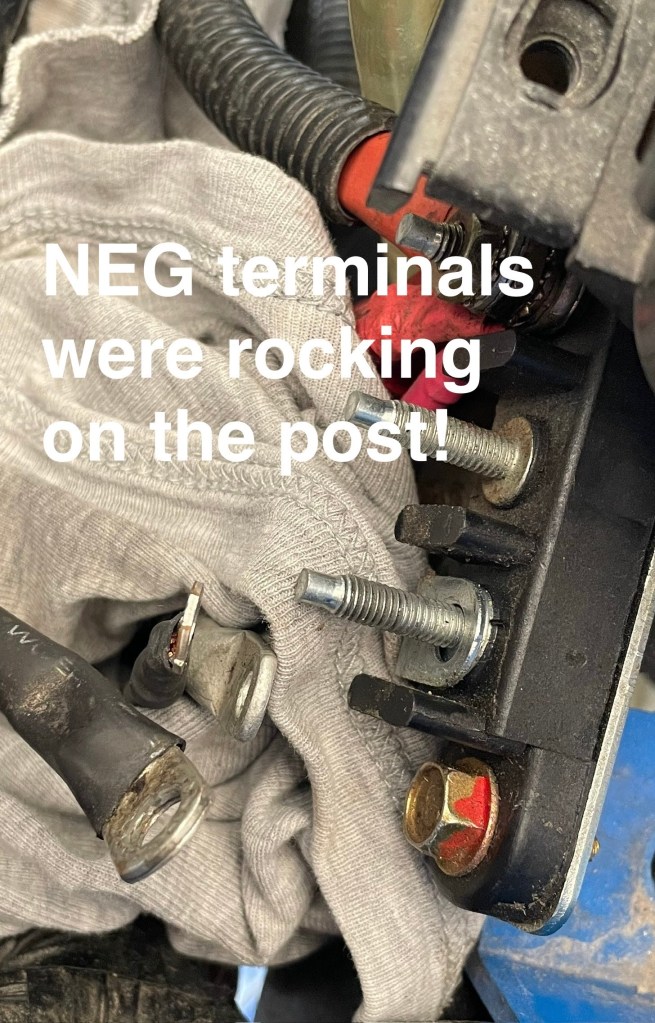
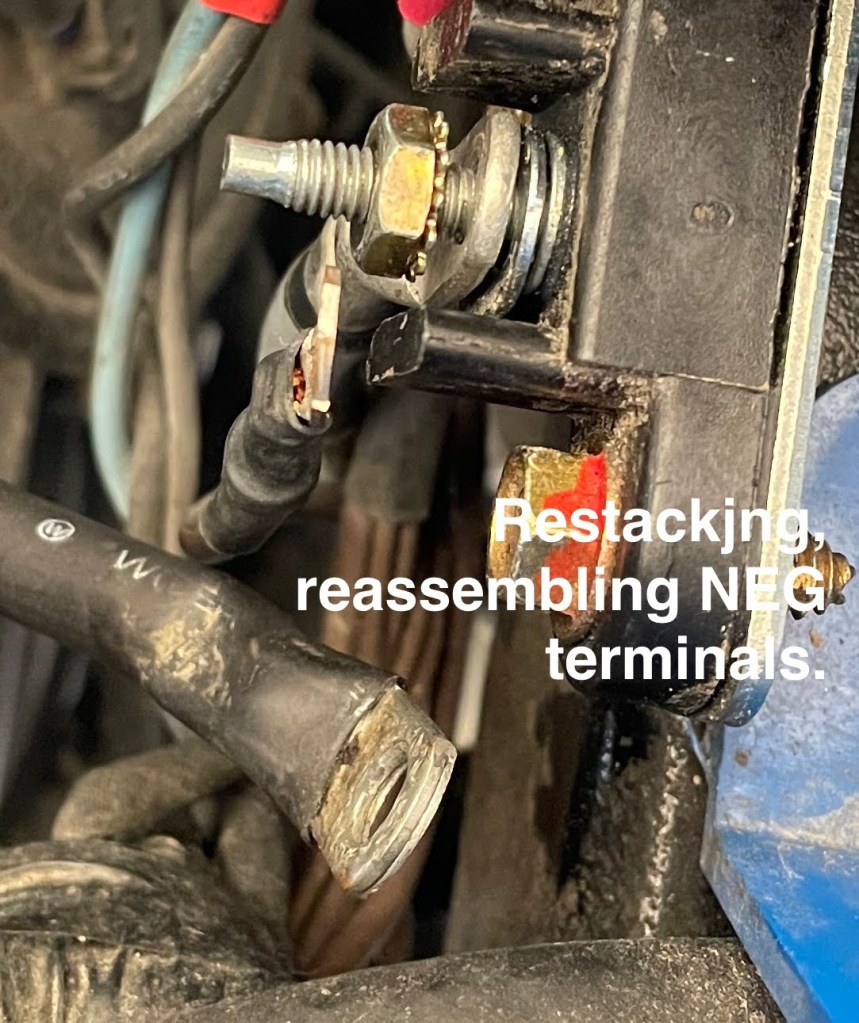
- The electrical distribution posts are dirt magnets. Clean them up. They’re also very easy to jog loose, despite having some integrated star-washer-nuts. As soon as I finished servicing the POSITIVE posts, the adjacent NEGATIVE connections loosened up. Periodically re-snug the connections.
- Work methodically. Don’t even think about doing this work with the battery still in place (I didn’t do it and let a wrench cross the connections [sparks and the tool became hot to the touch).
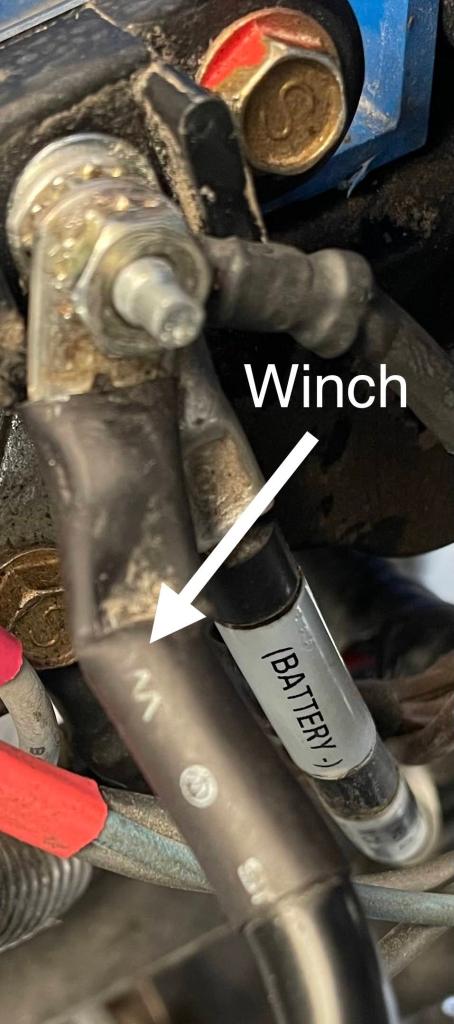
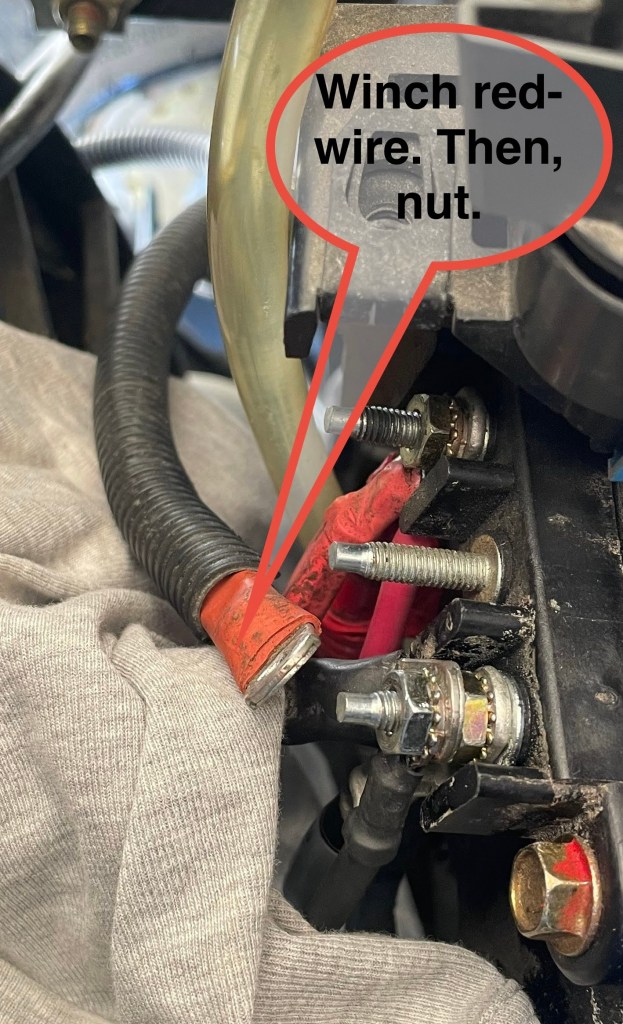
- Most failures are caused by sloppy maintenance and not keeping the surfaces clean. When I took the winch off to access the front differential, I neglected to clean the contacts. And the threaded posts were not snug. I let grime build-up on the battery posts, and sometimes left the retaining strap off. Bad. Bad. Don’t do that.
- They CAN BE FIGURED OUT. Go for it! I felt good about myself when it was all online again – and despite me doing donuts and hard turns in the upper parking lot, the connections held firm! Later in autumn, I want to replace the coolant (and I’ll be good for 5 years). It’s a messy job, with toxic green coolant… and it’ll need me wearing nitrile gloves for safety!
